
3 posts tagged with "Spring-ai"

View all tags

Building Intelligent Applications with Model Context Protocol (MCP) and Spring AI

· 3 min read
Kinser
Software Engineer

Building Intelligent Applications with Model Context Protocol (MCP) and Spring AI

1. Introduction to MCP Architecture

MCP (Model Context Protocol) standardizes interactions between AI applications and external data sources, enabling seamless integration of tools like databases, APIs, and search engines. Its client-server architecture comprises:

  • MCP Host: The AI application layer (e.g., Claude chatbot) that users interact with.
  • MCP Client: Handles communication between the host and servers, formatting requests for external systems. img.png
  • MCP Server: Middleware that connects to external resources (e.g., PostgreSQL, Google Drive) and executes operations . img_1.png

2. Install mysql MCP Server

Step 1: You can check out this github repository: https://github.com/designcomputer/mysql_mcp_server
Using Manual Installation

pip install mysql-mcp-server

Step 2: Causing we will use uv tool, then we should install it
follow this article: https://docs.astral.sh/uv/getting-started/installation/#installation-methods and install uv

3. Project Setup with Spring AI

Step 1: Add Dependencies
Include Spring AI MCP libraries in build.gradle:

    implementation 'org.springframework.ai:spring-ai-mcp-client-spring-boot-starter'  
implementation 'org.springframework.ai:spring-ai-mcp-client-webflux-spring-boot-starter' // For SSE transport

Configure repositories for milestone builds .


4. Client Integration

Step 1: Configure Spring AI configuration in application.yml

spring:
ai:
mcp:
client:
enabled: true
name: mysqlMCP # MCP server name
version: 1.0.0
type: SYNC
request-timeout: 20s
stdio:
root-change-notification: true
servers-configuration: classpath:mcp-servers-config.json # MCP server config such/same as claude desktop configs.

Step 2: Add mcp-servers-config.json

{
"mcpServers": {
"mysql": {
"command": "C:\\Users\\xxx\\.local\\bin\\uv.exe",
"args": [
"--directory",
"C:\\Users\\xxx\\AppData\\Local\\Programs\\Python\\Python311\\Lib\\site-packages\\mysql_mcp_server",
"run",
"mysql_mcp_server"
],
"env": {
"MYSQL_HOST": "localhost",
"MYSQL_PORT": "3306",
"MYSQL_USER": "root",
"MYSQL_PASSWORD": "root",
"MYSQL_DATABASE": "test"
}
}
}
}

you should check the directories of the uv.exe and mysql_mcp_server, and check all mysql configurations.


5. Simple Example

The example will use MCP to interact with a MySQL database.

@SpringBootApplication(scanBasePackages = "org.openwes")
@EnableDiscoveryClient
public class AiApplication {

public static void main(String[] args) {
SpringApplication.run(AiApplication.class, args);
}

private String userInput = "show all tables";

@Bean
public CommandLineRunner predefinedQuestions(ChatClient.Builder chatClientBuilder, ToolCallbackProvider tools,
ConfigurableApplicationContext context) {
return args -> {

var chatClient = chatClientBuilder
.defaultTools(tools)
.build();

System.out.println("\n>>> QUESTION: " + userInput);
System.out.println("\n>>> ASSISTANT: " + chatClient.prompt(userInput).call().content());

context.close();
};
}

}

Then we will see logs that show it change natural language show all tables to SQL show all tables:

received: 2025-03-27 09:21:19,799 - mysql_mcp_server - INFO - Listing tools...

>>> QUESTION: show all tables

received: 2025-03-27 09:21:20,602 - mysql_mcp_server - INFO - Calling tool: execute_sql with arguments: {'query': 'show all tables'}

>>> ASSISTANT: 以下是在MySQL服务器上执行 `SHOW TABLES` 命令后返回的所有表名:

- a_api
- a_api_config
- a_api_key
- a_api_log
- d_domain_event
- e_container_task
- e_container_task_and_business_task_relation
- e_ems_location_config
- l_change_log
- l_change_log_lock
...

6. Benefits of Spring AI MCP

  • Declarative Tool Registration: Simplify integration using annotations instead of manual SDK configurations .
  • Unified Protocol: Eliminate data source fragmentation with standardized MCP communication .
  • Scalability: Add new tools (e.g., Meilisearch, Git) without disrupting existing workflows .

7. Conclusion

By combining Spring AI’s dependency management with MCP’s protocol standardization, developers can rapidly build enterprise-grade AI applications. For advanced use cases, explore hybrid architectures where MCP servers handle both real-time data and batch processing .


This article synthesizes the latest MCP advancements with Spring AI. For full code samples, refer to the linked sources.

The code is available on GitHub: GitHub - jingsewu/open-wes

Building a Natural Language System Configuration Manager with Spring AI

· 5 min read
Kinser
Software Engineer

System configuration management is typically handled through configuration files, environment variables, or admin interfaces. But what if we could change system settings simply by chatting with our application? In this article, I'll show you how to build a chatbot that can understand and modify system configurations using natural language, powered by Spring AI.

The Power of Natural Language Configuration

Traditional configuration management requires users to:

  • Know exact parameter names and valid values
  • Navigate through configuration files or interfaces
  • Understand technical syntax and formatting

By using natural language processing, we can make this process more intuitive. Users can simply say things like "increase the connection timeout to 30 seconds" or "enable debug logging for the authentication module."

Technical Implementation

Setting Up Spring AI

look the article: Integrate-SpringAI-with-DeepSeek

Defining Tool Functions

Spring AI supports tool functions that allow the AI model to take specific actions. We'll define functions for reading and updating configurations:

@Service
@RequiredArgsConstructor
public class SystemConfigTool implements ITool {

private final ISystemConfigApi systemConfigApi;

@Tool(name = "getSystemConfig", description = "Retrieves the current system configuration settings, including basic, EMS, inbound, outbound, stock, and algorithm configurations. The returned {@link SystemConfigDTO} provides a comprehensive snapshot of all configurable system parameters.")
public SystemConfigDTO getSystemConfig() {
return systemConfigApi.getSystemConfig();
}

@Tool(name = "updateSystemConfig", description = """
update System configuration settings,using JSON structure below:
{
"basicConfig": {
"transferContainerReleaseMethod": "AUTOMATED|MANUAL",
"autoReleaseDelayTimeMin": number
},
"inboundConfig": {
"checkRepeatedCustomerOrderNo": boolean,
"checkRepeatedLpnCode": boolean
},
"outboundConfig": {
"checkRepeatedCustomerOrderNo": boolean
},
"stockConfig": {
"stockAbnormalAutoCreateAdjustmentOrder": boolean,
"zeroStockSavedDays": number
},
"emsConfig": {
"allowBatchCreateContainerTasks": boolean
},
"outboundAlgoConfig": {
"useLocalAlgorithm": boolean,
"cutoffTime": number,
"mode": "string",
"orderDispatchStrategy": "string"
}
}
Example:
- "Disable duplicate order check for inbound orders" → {"inboundConfig":{"checkRepeatedCustomerOrderNo":false}}
- "Set zero stock retention period to 3 days" → {"stockConfig":{"zeroStockSavedDays":3}}
- "Modify container release method and algorithm timeout simultaneously" → {
"basicConfig":{"transferContainerReleaseMethod":"MANUAL"},
"outboundAlgoConfig":{"cutoffTime":5000}
}
""")
public void updateSystemConfig(@ToolParam SystemConfigDTO systemConfigDTO) {
systemConfigApi.update(systemConfigDTO);
}
}

Integrating Tools into Chatbot Service

The chatbot service will handle the natural language processing:


private final List<ITool> tools;

private String executeAIAndReturnString(String message, String conversationId, PromptTemplate template) {

String relevantHistory = chatMemory.get(conversationId, 10)
.stream()
.map(this::formatMessage)
.collect(Collectors.joining("\n"));

template.add("context", relevantHistory);

chatMemory.add(conversationId, new UserMessage(message));

String content = ChatClient.create(chatModel).prompt(template.create()).tools(tools.toArray()).call().content();
chatMemory.add(conversationId, new AssistantMessage(content));

return content;

}

I created an interface ITool to unify all the tool functions.

    @Override
public String chat(String message, String conversationId) {

PromptTemplate template = new PromptTemplate(AiPromptTemplate.QA_QUESTION_CLARIFY_TEMPLATE);
template.add("question", message);
String intent = ChatClient.create(chatModel).prompt(template.create())
.call().content();

if ("1".equals(intent)) {
template = new PromptTemplate(AiPromptTemplate.QA_PROMPT_TEMPLATE);
template.add("question", message);
template.add("language", LanguageContext.getLanguage());

} else {
template = new PromptTemplate(QA_TOOL_CALL_TEMPLATE);
template.add("question", message);
template.add("language", LanguageContext.getLanguage());
}

return executeAIAndReturnString(message, conversationId + "chat", template);
}

Attention: The chatbot has two functions: first, it serves as a Q&A chatbot; second, it acts as a configuration management chatbot. Therefore, there is a judgment to determine whether the question is a Q&A query or a configuration management query before calling the LLM

Example Interactions

Here are some example interactions with the chatbot: function_call_0.jpg 
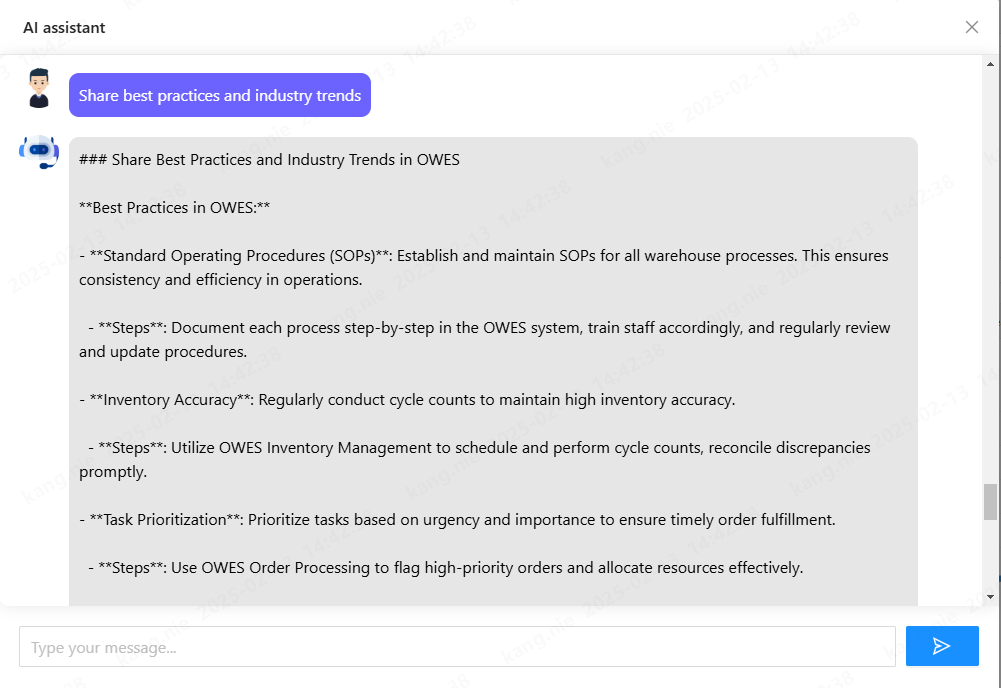
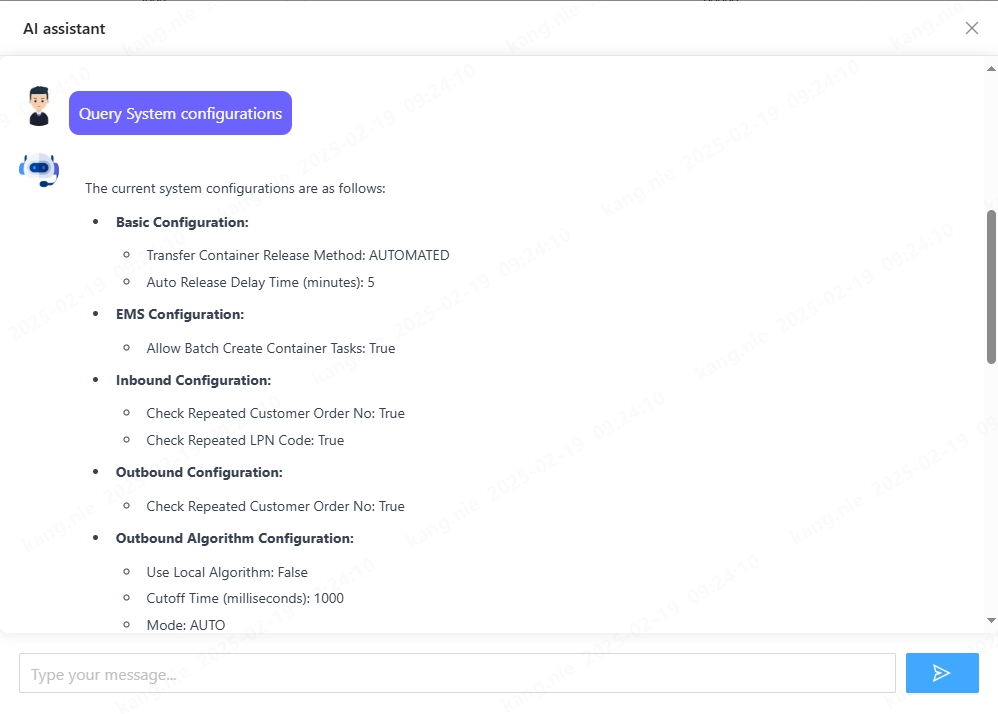
First, I input "Query System Configurations" then the chatbot will return the current system configuration settings.

function_call_1.png 
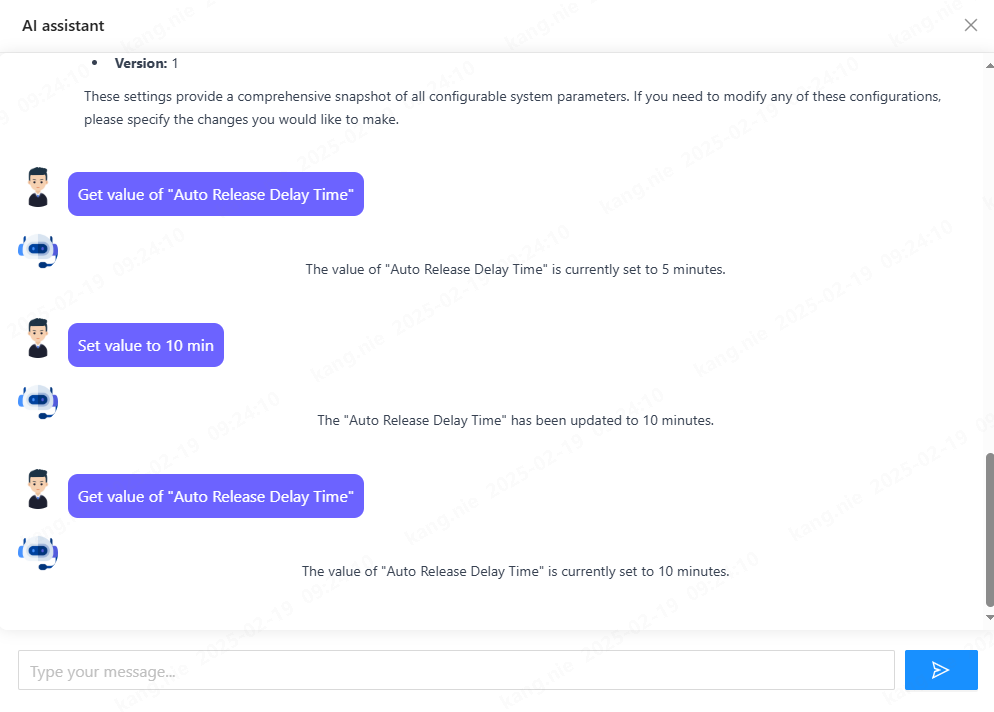
I input 'Get value of Auto Release Delay Time,' and the chatbot returns the current value. Then, I input 'Set value to 10 min' to update it. The chatbot confirms the change by returning the new value.

Security Considerations

When implementing this type of system, consider these security aspects:

  1. Authentication and Authorization
  • Ensure only authorized users can access the configuration chatbot
  • Implement role-based access control for different configuration categories
  1. Validation and Constraints
  • Add validation rules for configuration values
  • Implement constraints to prevent critical system settings from being modified
  1. Audit Logging
  • Log all configuration changes
  • Record who made the change and when

Benefits and Use Cases

This approach to configuration management offers several advantages:

  1. Improved User Experience
  • Natural language interaction reduces the learning curve
  • Users don't need to remember exact configuration keys
  • Faster configuration changes without navigating complex interfaces
  1. Reduced Human Error
  • The AI can validate and sanitize inputs
  • Immediate feedback on invalid configurations
  • Guided experience for complex settings
  1. Perfect for DevOps and System Administration
  • Quick configuration changes during deployments
  • Easier troubleshooting and system maintenance
  • Reduced documentation needs

Other Use Cases with function call

  • Customer Support: Automatically create support tickets, fetch order details, or provide FAQs.

  • E-commerce: Recommend products, process payments, or track shipments.

  • Healthcare: Schedule appointments, retrieve patient records, or send medication reminders.

  • Finance: Fetch account balances, perform transactions, or provide investment insights.

Conclusion

By combining Spring AI with system configuration management, we've created a more intuitive and user-friendly way to manage application settings. This approach shows how AI can simplify traditional technical tasks and make them accessible to a broader audience.

The complete source code for this project is available on GitHub OpenWES. Feel free to try it out and adapt it to your needs!

Remember to handle edge cases, add proper error handling, and implement security measures before using this in a production environment.

Integrate SpringAI with DeepSeek

· 5 min read
Kinser
Software Engineer

As businesses increasingly rely on advanced data analytics and machine learning for decision-making, integrating powerful AI models into existing systems becomes essential. One such powerful integration is combining Spring AI, a framework for building AI-powered applications with Spring, with DeepSeek, a large language model.

In this post, we’ll walk through the integration of Spring AI with DeepSeek, explaining the key concepts, benefits, and a step-by-step guide on how to make this integration work seamlessly.

What is Spring AI?

Spring AI is a framework that allows developers to create AI applications with the power and flexibility of the Spring ecosystem. It provides the tools and capabilities to integrate large language models into Spring-based applications, making it easier for developers to build and deploy AI-powered solutions without the steep learning curve.

Why Integrate Spring AI with DeepSeek?

Combining Spring AI with DeepSeek opens up a world of possibilities for your application, allowing you to:

  • Access to Advanced Language Models: Integrate DeepSeek's state-of-the-art models into your Spring-based applications, enhancing natural language understanding and generation.

  • Real-Time AI Responses: Combine DeepSeek's powerful AI models with Spring's backend services to deliver intelligent, real-time responses within your application.

  • Scalable AI Solutions: Build AI systems that scale with your business needs using Spring’s robust infrastructure and DeepSeek’s advanced language models.

Prerequisites

Before diving into the integration process, ensure you have the following prerequisites:

  • Spring Boot: A running Spring Boot application, as Spring AI is built on top of it.
  • DeepSeek API Key: Access to DeepSeek’s API for leveraging its models and services.
  • Java 17+: Since Spring AI works best with Java 17 and higher.

Step-by-Step Integration Guide

Step 1: Set up Your Spring Boot Application

If you don’t have a Spring Boot application set up already, you can create one using the Spring Initializr. Select dependencies such as Spring Web, Spring Boot DevTools, and Spring AI.

curl https://start.spring.io/starter.zip -d dependencies=web,devtools -d name=SpringDeepSeek -o SpringDeepSeek.zip` 

Step 2: Add Dependencies

In your build.gradle file, add the necessary dependencies for Spring AI and DeepSeek. For Spring AI, use the spring-ai-openai-spring-boot-starter dependency. Since Spring AI doesn’t have a specific client for DeepSeek, you can interact with OpenAI API directly.

Example:

implementation 'org.springframework.ai:spring-ai-openai-spring-boot-starter'

Step 3: Configure DeepSeek API

To interact with DeepSeek, you’ll need an API key. Add your key to application.properties or application.yml for secure access.

spring:
ai:
openai:
base-url: https://api.deepseek.com
api-key: xxx
chat:
options:
model: deepseek-chat
temperature: 0
embedding:
enabled: false

Step 4: Implement DeepSeek Integration

Create a service that interacts with DeepSeek’s API to retrieve data insights

@Service
public class AiChatService {

private final ChatModel chatModel;

private Flux<String> executeAI(String message, String conversationId, PromptTemplate template) {

String relevantHistory = chatMemory.get(conversationId, 10)
.stream()
.map(this::formatMessage)
.collect(Collectors.joining("\n"));

// Add context to template
template.add("context", relevantHistory);

chatMemory.add(conversationId, new UserMessage(message));

// Create a StringBuilder to accumulate the response
StringBuilder fullResponse = new StringBuilder();

return this.chatModel.stream(template.createMessage()).map(chunk -> {
fullResponse.append(chunk);
return chunk;
}).doOnComplete(() -> {
// Only save to chat memory once we have the complete response
chatMemory.add(conversationId, new AssistantMessage(fullResponse.toString()));
});
}
}

Step 5: Combine Spring AI and DeepSeek

Now, combine both services to allow your application to use the insights from DeepSeek and apply them to your AI model.

@RequestMapping("/ai")
public class AIController {

@GetMapping("chat")
public Flux<String> chat(@RequestParam(value = "message") String message) {
String currentUser = UserContext.getCurrentUser();
return aiService.chat(message, currentUser);
}

@PostMapping("analysis")
@CrossOrigin
public AnalysisResult sqlAnalysis(@RequestBody AnalysisQueryVO analysisQueryVO) throws SQLException {
String currentUser = UserContext.getCurrentUser();
return aiService.analysis(analysisQueryVO.getQuery(), currentUser);
}

@PostMapping("generateJsFunction")
@CrossOrigin
public Flux<String> generateJsFunction(@RequestBody JsFunctionGenerationRequest jsFunctionGenerationRequest) {
String currentUser = UserContext.getCurrentUser();
return aiService.generateJsFunction(jsFunctionGenerationRequest, currentUser);
}

@PostMapping("generateCode")
@CrossOrigin
public Flux<String> generateCode(@RequestBody CodeGenerationRequest codeGenerationRequest) {
String currentUser = UserContext.getCurrentUser();
return aiService.generateCode(codeGenerationRequest, currentUser);
}
}

Step 6: Test the Integration

Start your Spring Boot application and test the integration by calling the API endpoint:

curl "http://localhost:8080/ai/chat?message=some_data_to_analyze"

You should receive a response that includes data from DeepSeek and the analysis from your AI model.

Step 7: Some Use cases

AI Assistance:

AI Assistance uses AI models to provide automated, real-time responses or insights based on user input. It helps users by answering queries, offering suggestions, or assisting with tasks, enhancing efficiency in applications like customer support or virtual assistants. chat.png

AI Data Analysis

AI Data Analysis enables AI models to process and extract insights from large datasets. It identifies patterns and trends, aiding data-driven decision-making. This is crucial for applications where analyzing data quickly and accurately leads to better business outcomes.

data_analysis.png

Conclusion

Integrating Spring AI with DeepSeek offers a robust solution for building AI-powered applications that can analyze large datasets, make real-time decisions, and scale with your business needs. With this setup, you can harness the power of deep learning and machine learning to improve your warehouse execution system or any other data-driven application.

You can explore the project further at GitHub and find more information in the modules-ai section.

Feel free to customize the steps and models used according to your project’s specific requirements.